The Omnipose integration in TrackMate works roughly as the Cellpose integration one. It requires Omnipose to be installed on your system and working independently. This page gives installation details and advices at how to use the omnipose integration in TrackMate.
Omnipose
Omnipose is a segmentation algorithm based on Deep-Learning techniques, and inspired from the Cellpose architecture. Omnipose is well suited for bacterial cell segmentation, and achieves remarkable performances on mixed bacterial cultures, antibiotic-treated cells and cells of elongated or branched morphology.
If you use the Omnipose TrackMate module for your research, please also cite the Omnipose paper:
doi:10.1038/s41592-022-01639-4
Example
E. Coli, Marie Anselmet and Rodrigo Arias Cartin, Barras lab, Institut Pasteur
Installation
TrackMate-Cellpose update site
The TrackMate-Omnipose module is part of the TrackMate-Cellpose Fiji extension. Please check the installation instruction on the TrackMate-Cellpose page.
omnipose
The integration works with the Omnipose version 0.3.6. It doesn’t work with the last version of Omnipose.
Like for the cellpose integration, you need to have a working python installation of omnipose on the computer you want to use this extension with. To install Omnipose, you can refer directly to the installation guide provided on the Omnipose repository. We also give below a tested procude to install omnipose on a Windows machine via conda.
An example Windows installation working on GPU:
conda create -n omnipose
conda activate omnipose
conda install pytorch==2.0.0 torchvision==0.15.0 torchaudio==2.0.0 pytorch-cuda=11.8 -c pytorch -c nvidia
pip install omnipose==0.3.6
pip install cellpose-omni==0.7.3
The default models bact_phase_omni and bact_fluor_omni are stored in the cellpose pretrained models folder.
Troubleshooting “Found 0 spots” errors
On some systems we have noticed that sometimes TrackMate returns 0 detections for the cellpose and omnipose detectors, even when the installation of these two programs worked correctly. In most cases, this is due to the fact that the pretrained models have not been downloaded prior to running the TrackMate integration. To fix this, the easiest way is to launch the cellpose or omnipose Python GUI, and segment a single small image. This will trigger the download of the pretrained models. After this, the TrackMate integration should work as expected.
Usage
The integration is really close to the cellpose integration, with parameters that are almost identical (and a lot of shared code). The main thing that changed is the list of pretrained models. We refer to the TrackMate-Cellpose page for details.
Tutorial
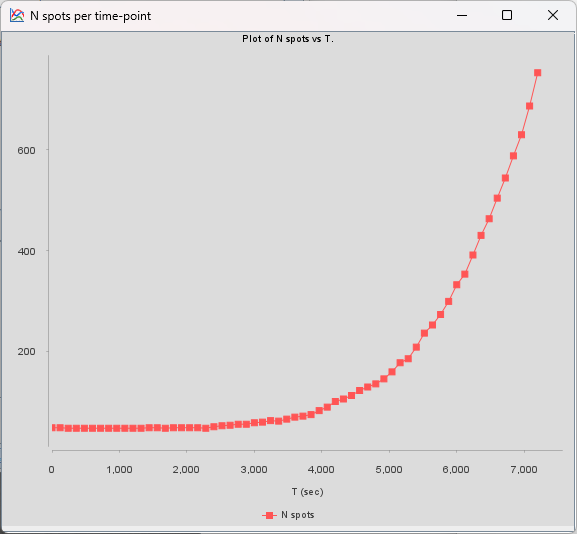
Here is a brief tutorial where we segment and track individual bacteria in several colonies. The source video follows E. coli bacteria imaged in phase contrast. We want to segment them, track them, and plot the growth curve for the bacteria imaged.
The image file can be found on Zenodo:
![]() Download it and save it somewhere convenient.
Download it and save it somewhere convenient.
After executing the installation procedure above, launch Fiji and open the image. It is a relatively large image with a small pixel size (70 nm). Each 2D frame is 1824 x 1896 and a bacteria of length 4 um is imaged over about 50 pixels. With this image selected, run TrackMate (Plugins > TrackMate).
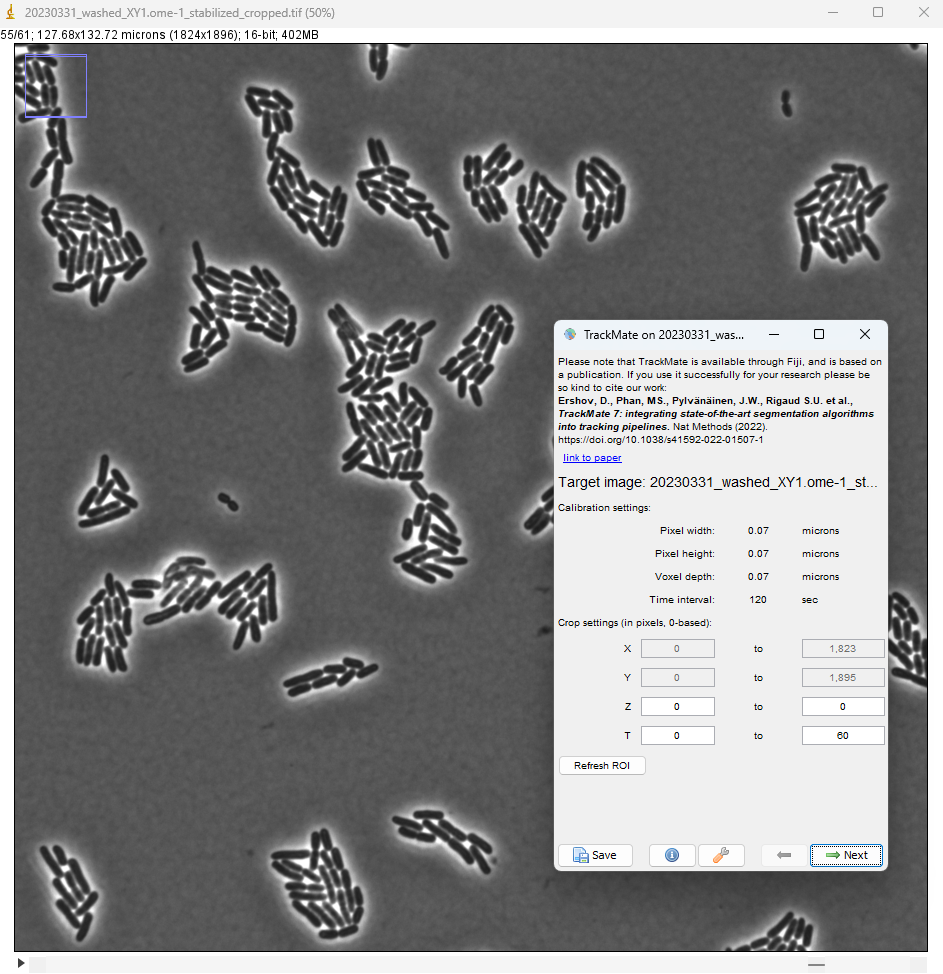
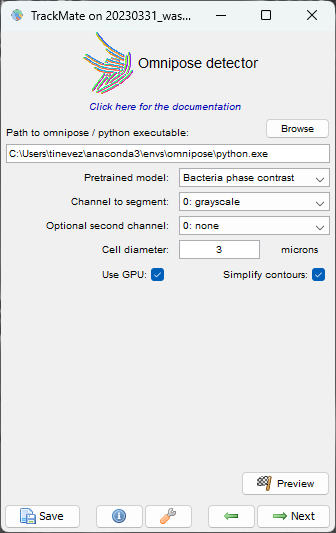
In the detector selection panel, pick the omnipose detector.
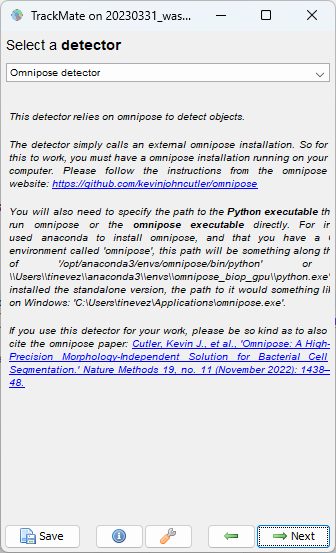
The configuration panel is quasi identical to that of the cellpose detector.
The list of pretrained models is however specific to omnipose.
Also, since in TrackMate we give the size of objects to detect in microns, we can expect to use a diameter value comparatively smaller for bacteria.
Here, the default values will give us satisfactory results.
You just need to edit the path to the python executable on your computer.
For a windows computer where omnipose has been installed following the instructions above, this path is something like C:\Users\tinevez\anaconda3\envs\omnipose\python.exe
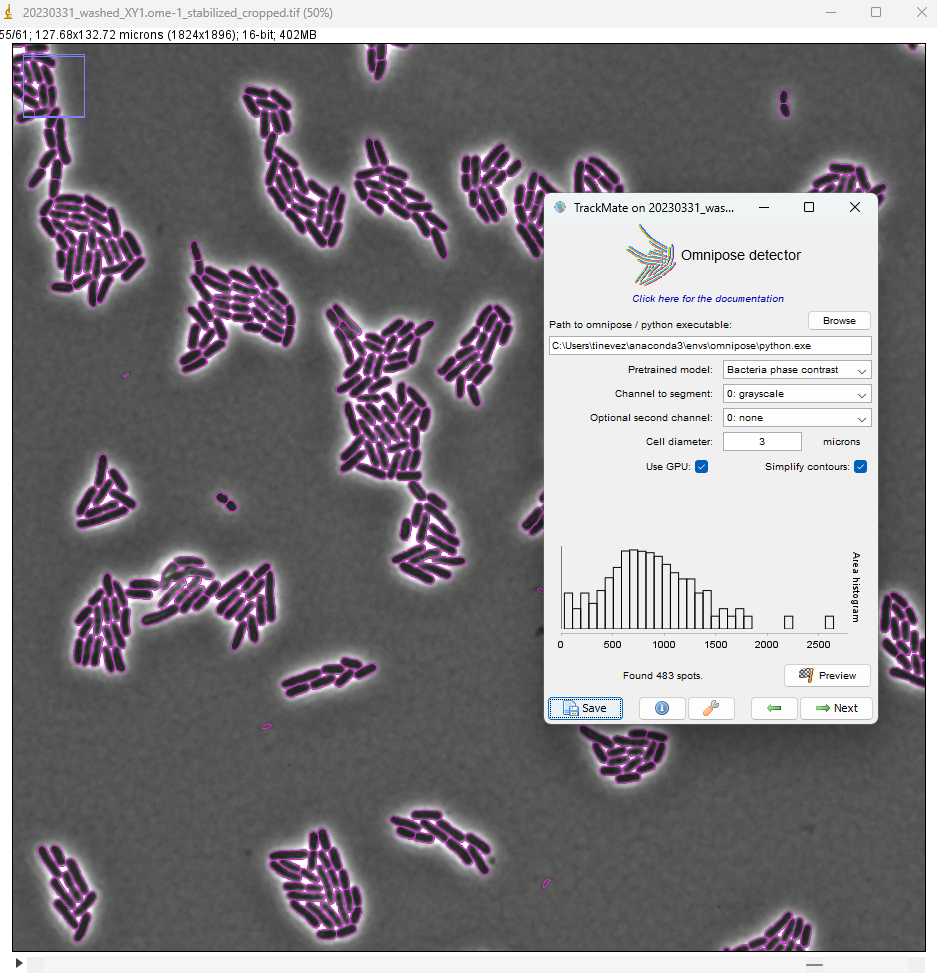
Click the Preview button to check that the settings give correct results.
Here the quality is equal to the number of pixels inside detected objects.
We see that there are some very small objects with settings we have, but otherwise the results are excellent with the default parameters.
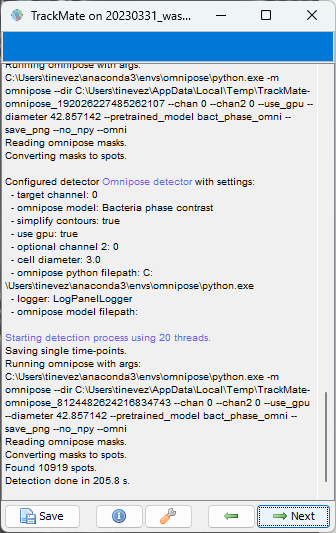
We can now run the detection over the whole movie by clicking the Next button.
On my windows machine with a NVIDIA 2080Ti, it takes about 3 to 4 seconds per frame.
When done, click Next to reach the initial filtering panel.
The quality histogram displays a small peak at low quality, corresponding to small spurious objects.
We can filter them out by setting the threshold in between the two peaks in the histogram.
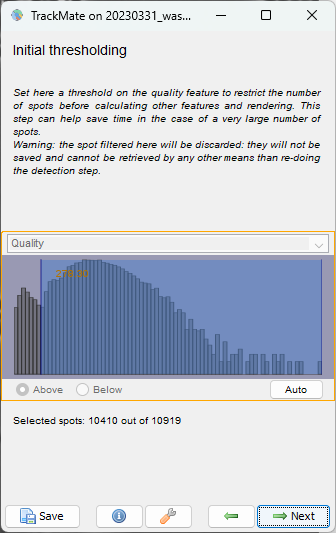
We can skip filtering objects.
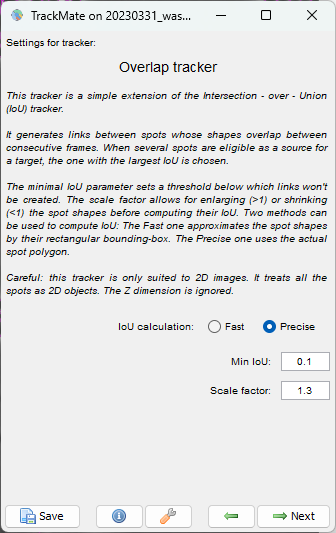
Click Next until you reach the tracker selection panel.
The bacteria do not move much, but divide, pushing each other away.
We found out that for this kind of dynamics the Overlap tracker gives good tracking results.
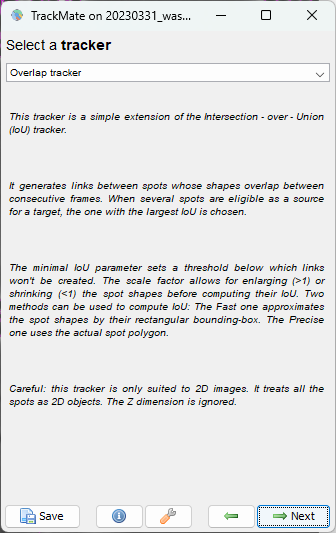
A few parameter needs to be tuned.
For the Min IoU we use 0.1.
For the Scale factor we use 1.3.
Click Next.
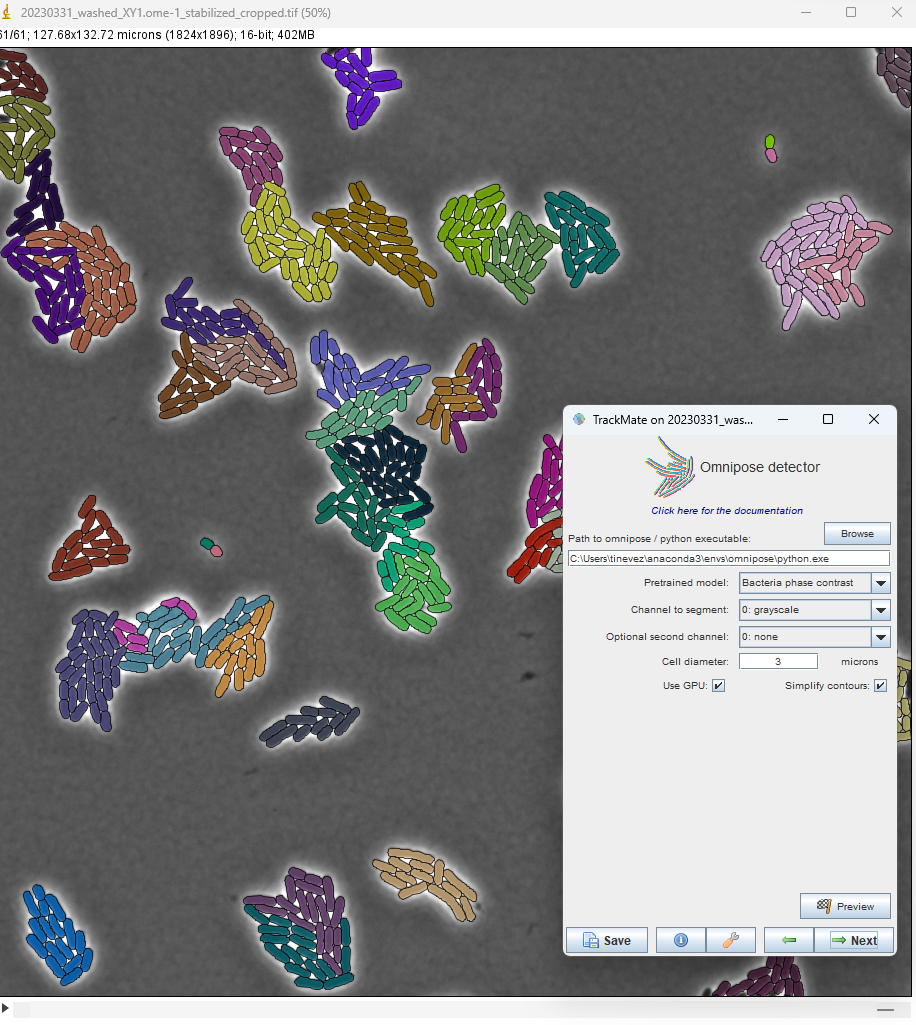
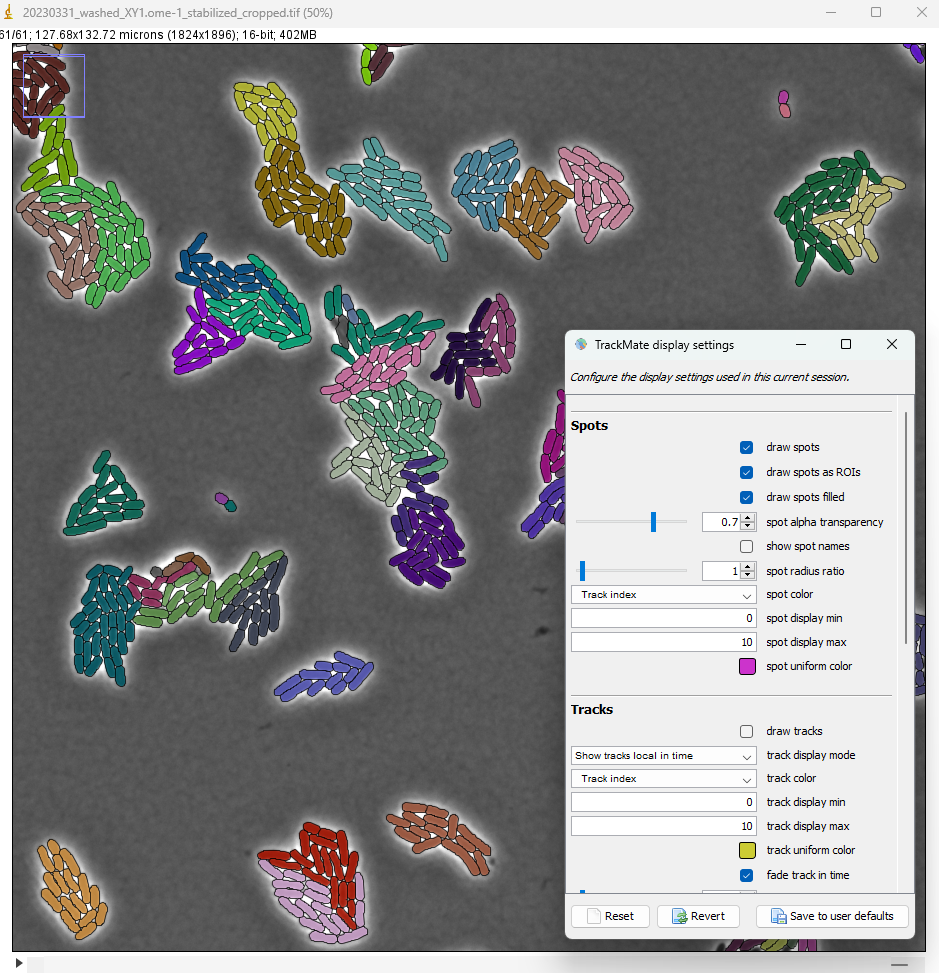
This yields a good lineage of the bacteria. We see each “colony” grows, and mix with the close ones. With the tracker settings we picked above, the lineage of each mother bacteria is preserved rather well, even when a colony touches its neighbors.
To color each bacteria by its colony, on the Display options panel click on the Edit settings button.
In the display settings window that appear, make the following changes:
- select
draw spots filled - set the
spot alpha transparencyto 0.7 - for
spot color, select Track index - uncheck
draw tracks
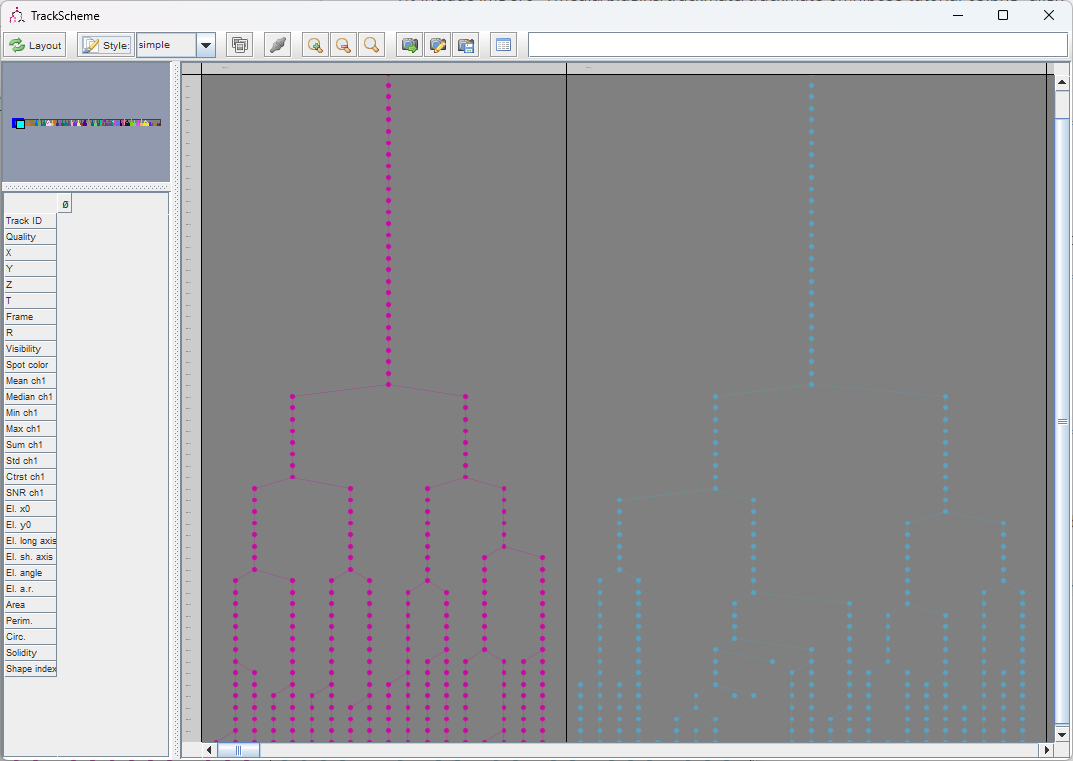
The lineages that we see in the TrackScheme window show that for some bacteria, there might be some linking errors late in the movie. But overall we could correctly detect the division events over 5 generations in this movie.
In the very last panel of TrackMate, an action called Plot N spots vs time highlights the exponential growth of the bacteria: